

Call Us Now !
+8615559551216

Order Online Now !
info@gsolarsbracket.com


 en
en es
es pt
pt ar
ar hr
hr ro
ro

To install an angled solar system on a metal roof, you will need to follow these general steps:
Assess your roof: Determine if your metal roof is structurally sound and can support the weight of the solar panels. Check for any weak spots, damages, or leaks. It's also important to ensure that your roof is facing the right direction to maximize sunlight exposure.
Obtain necessary permits: Before starting the installation, check with your local authorities to determine if any permits or approvals are required for installing a solar system. Compliance with local regulations is crucial.
Plan the solar array layout: Consider factors such as available roof space, shading issues, and the desired capacity of your solar mounting system. Design the layout to maximize energy generation and minimize shading.
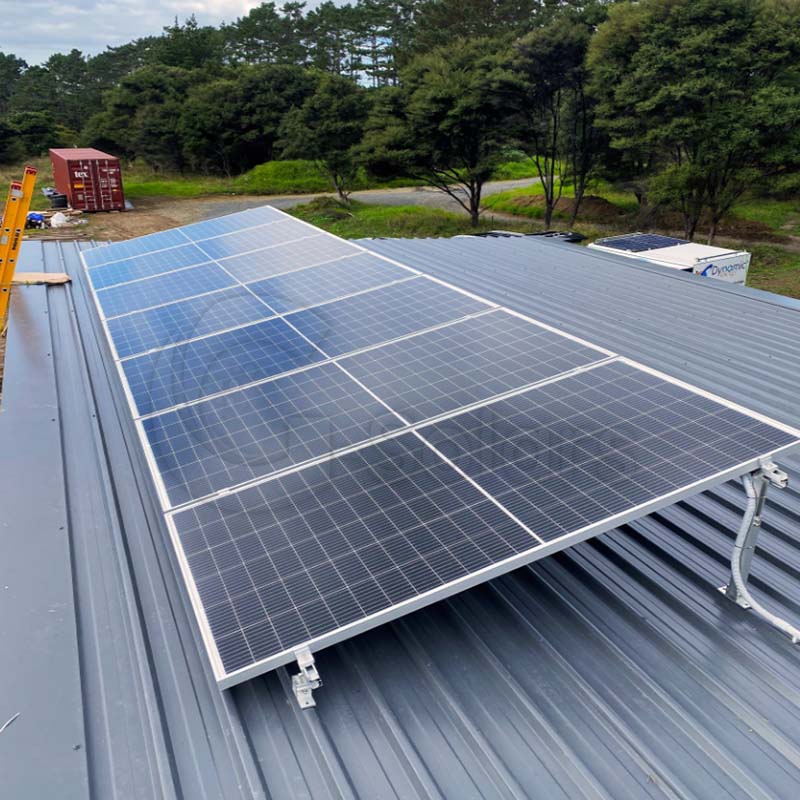
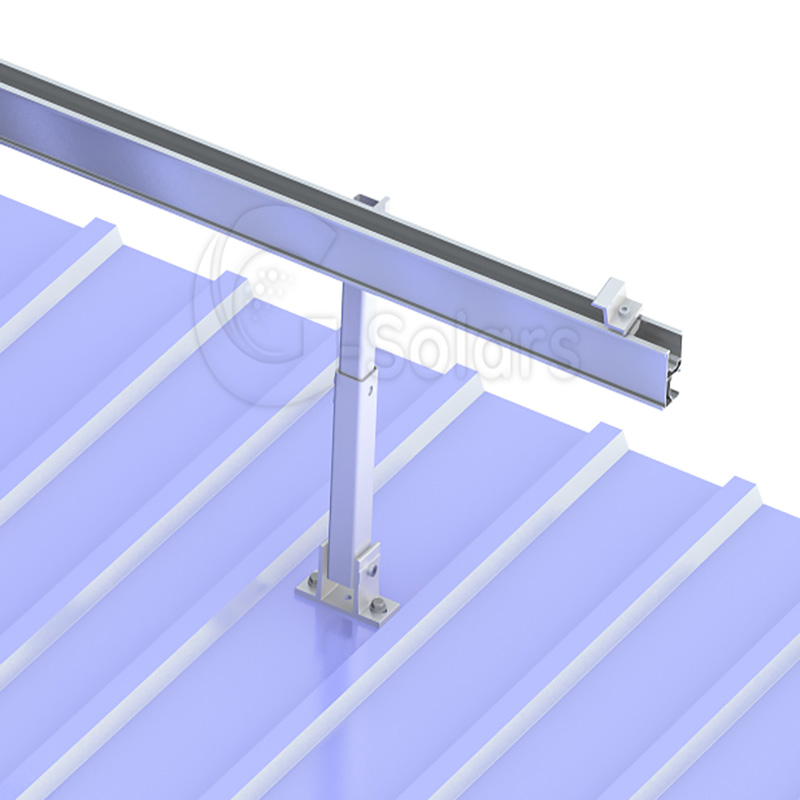
Install the mounting system:Tilt solar systems on metal roofs use a rail-based mounting system. Start by marking the locations for the roof attachments. Ensure the attachment points are properly sealed to prevent water leakage. Install the mounting rails according to the manufacturer's guidelines.
Attach solar panels to the mounting rails: Once the mounting rails are securely installed on the roof, attach the solar panels to the rails. Follow the manufacturer's instructions for mounting the panels correctly, using the provided hardware. Ensure proper alignment and spacing between the panels.
Connect the panels and wiring: Connect the solar panels in series or parallel configurations according to the electrical requirements of your solar system. Run the wiring from the panels to the inverter or junction box, following electrical codes and safety guidelines. Be sure to use suitable wire gauges and appropriate connectors.
Install the inverter: Mount the inverter in a suitable location near the main electrical service panel. Consult the manufacturer's instructions for proper installation and electrical connections.
Connect the inverter to the electrical system: Follow electrical codes and guidelines to connect the inverter output to the main electrical service panel. This step may require the assistance of a licensed electrician to ensure proper installation and compliance with local regulations.
Test and commission the system: Once the installation is complete, conduct a thorough check of the system, including all electrical connections and panel alignment. Test the system's performance and functionality, and ensure it is properly commissioned.
Monitor and maintain the system: Regularly monitor the performance of your solar system to ensure optimal energy production. Keep the panels clean and free from debris, and inspect the roof for any signs of damage or wear. If any issues arise, consult a professional for maintenance or repairs.
Please note that this is a general guide, and the specific installation process may vary depending on the type of solar panels, mounting system, and roofing materials used. It's always recommended to consult with a professional solar installer to ensure a safe and effective installation.

Please read on,stay posted,subscribe,and we welcome you to tell us what you think.
 IPv6 network supported
Sitemap
| Xml
| Privacy Policy
IPv6 network supported
Sitemap
| Xml
| Privacy Policy


